Guides
What Is an AI Image Agent? How It Works and When to Use One
An AI image agent plans, selects tools, creates and checks visual work. Learn how it differs from an image generator, plus its real trade-offs.
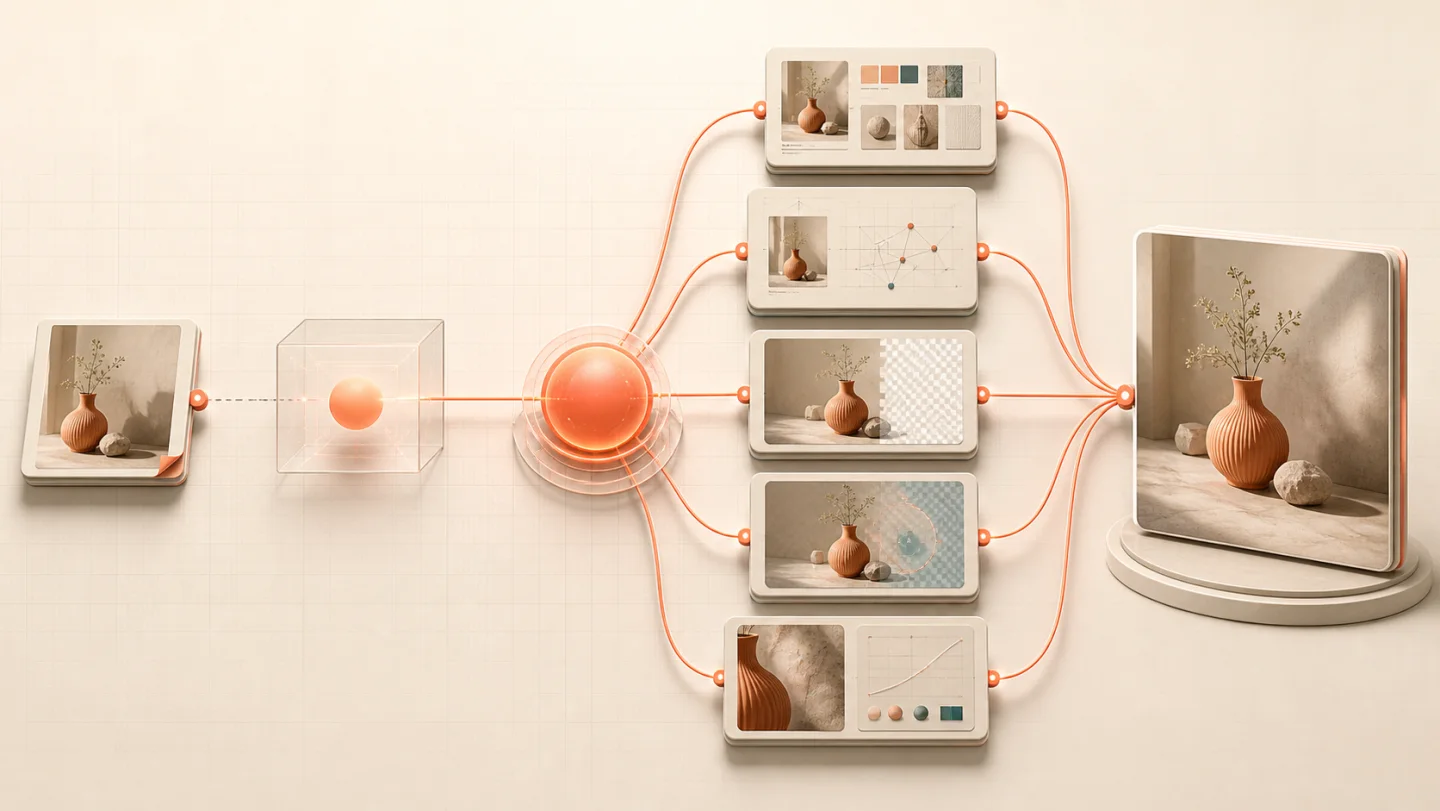
An AI image agent is software that takes a visual goal, decides which image operations are needed, uses the appropriate models or tools, and checks whether the result meets the brief. A standard AI image generator turns a prompt into an image. An agent manages the work around that generation: understanding references, planning multiple steps, choosing tools, preserving constraints, asking for approval, inspecting output and revising when necessary.
That definition follows the broader use of “AI agent.” OpenAI describes agents as systems that independently accomplish tasks by controlling workflow execution and selecting tools. Google likewise treats planning and action toward a goal as core agent capabilities. Applied to images, the “environment” is a creative workspace and the tools may include image generation, background removal, inpainting, relighting, compositing, format conversion and upscaling.
AI image agent vs AI image generator
The difference is not simply chat versus buttons. A generator can have a conversational interface, and an editor can offer dozens of AI features, without either one deciding how to complete a larger task. The distinction is who owns the workflow: you, a fixed template, or the software.
| Capability | Image generator | AI image editor | AI image agent |
|---|---|---|---|
| Input | A prompt and optional references | An image plus a chosen edit | A desired outcome, assets and constraints |
| Planning | Usually none | You choose each operation | Builds or adapts a multi-step plan |
| Tool choice | One selected model | You select a feature or model | Routes each step to a suitable tool or model |
| Iteration | You rewrite and regenerate | You manually make the next edit | Can inspect, revise and continue in context |
| Completion | Returns an image | Returns an edited image | Tries to deliver an asset that satisfies the brief |
| Control | Prompt and model settings | Direct operation-level control | Goal-level control, ideally with plan approval |
For example, “generate a ceramic vase on a beige background” is a single generation. “Turn this phone photo of my vase into three marketplace-ready product images, keep the label exact, replace the background, match the shadows and export at the required size” is a workflow. A generator handles one part. An agent can decompose the second request and coordinate the parts.
How the architecture works
Most useful image agents have a reasoning layer above a collection of specialist tools. The reasoning model does not need to draw every pixel itself. Its job is to maintain the goal, decide what should happen next and determine when the work is good enough—or when a person should take over.
1. Understand
Read the goal, source images, destination, style and details that must not change.
2. Plan
Break the request into ordered operations and surface missing decisions or risks.
3. Route
Choose a capable model or deterministic tool for each operation, not one model for everything.
4. Execute
Run the approved steps while preserving assets, parameters, cost and provenance.
5. Verify
Compare the output with the brief: composition, text, identity, edges, size and format.
6. Revise or deliver
Retry a failed step, ask for input, or package the finished files.
A strong implementation also has memory for the current session, tool contracts that describe what each operation can do, and guardrails around uploads, content policy and spending. Human approval matters most before an expensive or irreversible run. Runway, for example, exposes a mode where its Agent shows the model, prompt and estimated credit cost before generating. That is a product design choice, but it illustrates an important architecture principle: autonomy should be bounded and observable.
Why use an AI image agent? The pros
- You can specify the outcome instead of translating it into a sequence of tool commands. That is valuable when you know what the finished asset must do but not which image model or edit should come first.
- Different steps can use different strengths. A precise cutout, a generative background, a relight and a final upscale are not the same technical problem.
- The brief remains in context across iterations. “Keep the package label unchanged” can stay a workflow constraint instead of something you remember to repeat in every prompt.
- A visible plan creates a natural checkpoint for scope, cost and safety before generation begins.
- Repeatable workflows can turn one successful result into a product-photo set, campaign variant set or content series without rebuilding the process by hand.
The big trade-offs: the cons
- More steps mean more latency and usually more cost. If you need one exploratory image, a direct generator is faster.
- Errors can compound. A poor first cutout can make the background, shadows and upscale look wrong even if every later tool behaves correctly.
- Automatic routing may be opaque. A useful agent should reveal the proposed operations, material constraints and price instead of hiding them behind “magic.”
- Goal-level control is not always enough. Art directors and retouchers may need masks, layers, curves, precise typography and reproducible parameters that a conversational workflow cannot expose efficiently.
- The term is easy to overuse. Some products call a chat wrapper or a preset pipeline an agent even when it cannot choose or adapt its actions.
There are also familiar generative-image risks: model bias, invented detail, inconsistent text, uncertain training provenance and restrictions on commercial use. An agent can organize the workflow, but it does not make those underlying issues disappear. Review claims about licensing, data retention and model provenance for the exact service you use.
Who should—and should not—use one?
| A good fit | Use a direct generator or editor instead |
|---|---|
| Ecommerce teams turning source photos into consistent listing assets | You want quick visual exploration from one prompt |
| Marketers producing several formats from one approved campaign brief | You already know the exact model and settings you need |
| Creators who repeat generation, cleanup and upscaling by hand | You need pixel-level masks, layers or typography control |
| Non-specialists who can describe a result but not the tool chain | The task is a single deterministic edit such as a crop or resize |
| Teams that need reviewable plans and repeatable constraints | Policy, privacy or provenance requirements rule out the available models |
The dividing line is workflow complexity, not experience level. Professionals benefit when coordination is repetitive; beginners benefit when tool selection is confusing. Both should prefer a direct tool when the operation is already obvious. If all you need is final-size detail, for example, go straight to the AI image upscaler instead of asking an agent to rediscover that choice.
How to use The AI Image Agent, step by step
The workflow below maps directly to the Agent in this project. Planning and revising are available without an account; executing a multi-step Agent plan requires a signed-in Creator, Pro or Studio subscription and enough credits. Nothing is generated until you approve the plan.
1. Open the workspace
Choose “Ask the agent” when arriving from a single-purpose tool, or start directly in the Agent workspace. The instruction box is ready for an outcome, not a tool command.
2. Describe the result
State the deliverable, destination and constraints. Include anything that must remain exact, such as a logo, product shape, face, wording, crop or color.
3. Add source files
Use “Add an image or video,” drag files into the composer, or paste them. The workspace accepts up to six files; images can be JPG, PNG, WebP or GIF up to 10 MB each.
4. Select Review plan
The Agent reads the request. If one decision is missing, it asks one focused question with selectable answers. Otherwise it returns “Here is what I would do” with ordered steps.
5. Revise or approve
Select “Change request” to edit the instruction and re-plan for free. When the plan is correct, eligible subscribers select “Confirm and run”; anonymous users are prompted to sign in first.
6. Review and continue
Open the result full size or compare before and after. Download it, regenerate the approved plan, or select “Edit this result” and describe one more change—the previous result becomes the next input automatically.
You can open the Agent workspace and complete steps 1–5 now. The Agent can plan text-to-image, image editing, background replacement, product photography, style transfer, variations, upscaling and multi-step combinations. Generated results are saved to your history; uploaded source files are read for the run but are not written to project storage. The AI image agent overview remains the canonical explanation of the product and its limits.
When a focused image tool is the better choice
An agent is useful when the job needs several decisions. When the operation is already clear, take the shortest route: reverse-engineer a prompt from an image, remove background from image, or increase image resolution. Each focused page explains the operation and its limits before the workspace handoff, so the agent does not have to rediscover a decision you have already made.
For worked examples, follow the image-to-prompt walkthrough. Before enlarging a result, use the image upscaling guide to choose a scale and inspect reconstructed detail.
Examples and further reading
The category is evolving, so the clearest comparisons come from primary documentation. The links below show the boundary from foundational agent definitions, through single-model generation, to products that explicitly plan or combine multi-step creative work.
The durable idea is simple: an image model makes or edits pixels; an AI image agent is the goal-directed layer that decides how those capabilities should work together. Judge products by observable behavior—planning, tool choice, memory, verification and user control—not by the label on the navigation tab.
Tools this guide is about
- Home
- Image Agent Workspace
- Image to PromptPick the format you need, then drop your picture into the workspace and get the prompt that recreates it, written in the syntax of the model you will paste it into.
- Remove Background from ImageChoose what the background should become, then drop your picture into the workspace and check the cut-out against a checkerboard before you download it.
- Upscale ImageEnlarge photos or line art up to 8x. Choose the smallest scale that reaches your target, then inspect the result at full size.